Photoshop (Ps) is Adobe’s photo editing, image creation and graphic design software and is used by photographers, graphic designers, video game artists, advertising and meme artists…
And now you! Yes, you can develop your artistic side and create your own roller banners artwork ready for print using this industry standard software. So, crack open your laptop, take a comfy pew and follow these few simple steps.
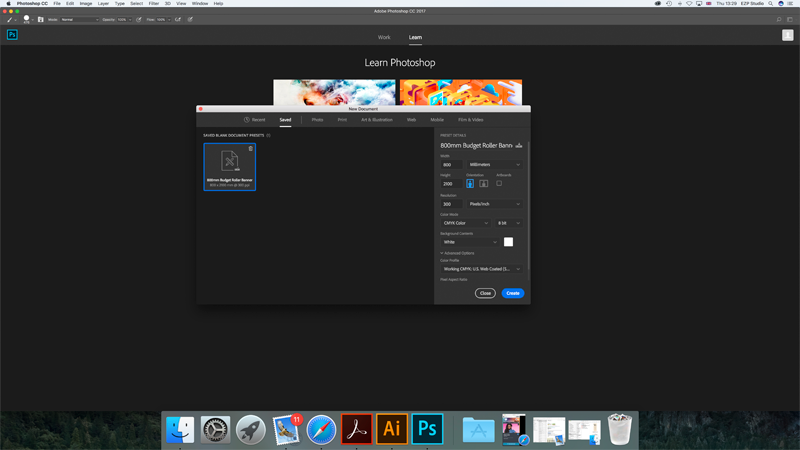
Create a new document in Photoshop, select File and New

This will open a new file window where you can select all the properties of your banner. Select your chosen size (e.g. 8ft x 2ft) and resolution (120pixel/inch, as banners can be seen from about 10ft). If you’re unsure which resolution to select give the Eazy gang a call and they’ll be happy to advise. Note to reader, the further away the viewer will stand the lower the resolution can be for your artwork.
Make sure your colour mode is CMYK which is suitable for printing and background contents is set to white for a white background.
Click OK. Another layer will appear ready for you to start designing to your hearts content.
Insert an image, select File and Place
Allow your creativity to flow and choose high quality images to tell your story. You can adjust your image by clicking on it and dragging to the required spot. To re-size, hover the cursor over one corner until it appears as a double arrow. Hold shift and drag to re-size proportionally.
Repeat this process with other images, graphics and logos of your preference.
Leave 100mm at the bottom of your sheet blank as a bleed area during the printing process.
Adding text
Select the Type Tool from the side menu. Choose an area you wish to fill with text and start typing. To move text around select its layer and the Move Tool from the left hand side menu, then click and drag.
You can also re-size text as you did with the images.
Changing the background colour
Choose a colour from the colour mixer or swatches. Select the Paint Bucket Tool from the menu on the left and click on the background layer.
Saving your design
Select File, Save As… When you’re happy with your design and feel it’s ready for print always save your document in the Photoshop format in the first instance so you can make any future changes easily.
Then go to Layer, Flatten Image and repeat the process. This will prevent your file from becoming too large and reduce any errors in the printing process.

Click Save. A “Save adobe PDF dialogue box” will pop up. Highlight High Quality Print then click Save PDF. This file is now ready to deliver to your printer or to submit to the design studio.
To check your artwork is set up appropriately go to the Artwork Guidance page.
And if you’re not entirely satisfied with your own efforts you can always call the Eazy studio team on 02380 700 111 to help put together something special for you for as little as £15.00. Go to Eazy design for more information.